Direct ethernet connection between a client PC and XO-VAC+
The easiest and safest way to connect to an XO-VAC+ is to establish a direct ethernet connection between the client PC and XO-VAC+.
flowchart LR
    A[XO-VAC+]
    B[Client PC]
A <-- TCP/IP --> B- Network isolation: XO-VAC+ can only be accessed through the client PC.
- Connection recovery: Client PC can be disconnected without disrupting the XO-VAC+ operation.
- Data logging: Logs and run data are stored by the XO-VAC+ embedded server even if the client PC is not connected.
Cons:
- Monitoring: XO-VAC+ cannot be monitored if the Client PC is not physically connected.
- Physical access: The Client PC has to be physically attached to XO-VAC+ with an ethernet cable
Warning
The XO-VAC+ embedded server should not be directly exposed to the internet as it is not updated as often as a regular Windows PC.
Hardware
If the Client PC does not have an available physical ethernet interface, it is possible to use USB-to-Ethernet adapters.
The XO-VAC+ embedded server network interface is an Intel EC1000S. It supports 1.0 Gbps, 100 Mbps and 10 Mbps in Half Duplex or Full Duplex. By default, XXO-VAC+ ships with the "Auto Negotiation" setting for "Speed and Duplex" with a MTU of 1500.
Client PC connected to only one network interface
This is the easiest set-up scenario. The Client PC has one ethernet connection to the XO-VAC+ and is not connected to any wireless or ethernet network.
Collect XO-VAC+ network information
At the back of the XO-VAC+, there is a sticker with the default XO-VAC+ IP address. Make a note of it.
Warning
Do not move XO-VAC+ while its vacuum system is operating as shocks or bumps can damage the turbopump.
It is possible to change the network configuration of the XO-VAC+ embedded server. If the network configuration has been changed, you need to check with your network admin what are the current network settings of XO-VAC+.
If you do not remember the current network settings of XO-VAC+, it is possible to reflash the XO-VAC+ firmware to its stock configuration. See the How to reset XO-VAC ? tutorial.
Warning
Reflashing XO-VAC+ to its stock configuration will delete logs and run data stored on the XO-VAC+ embedded server.
Changing Client PC network interface settings
It is necessary to change the default settings of the Client PC network adapter to set-up a direct connection to XO-VAC+. The network adapter needs to get assigned a fixed IP address on the same subnetwork as XO-VAC+.
Windows 10
Right click on the Network icon at the bottom right of the Windows 10 Desktop and click on "Open Network & Internet settings".
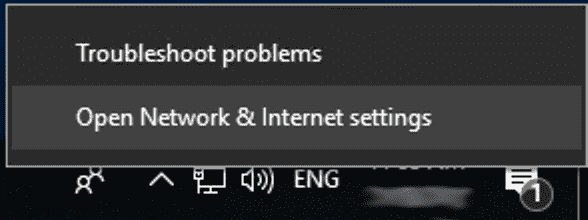
Then, click on "Change adapter options".
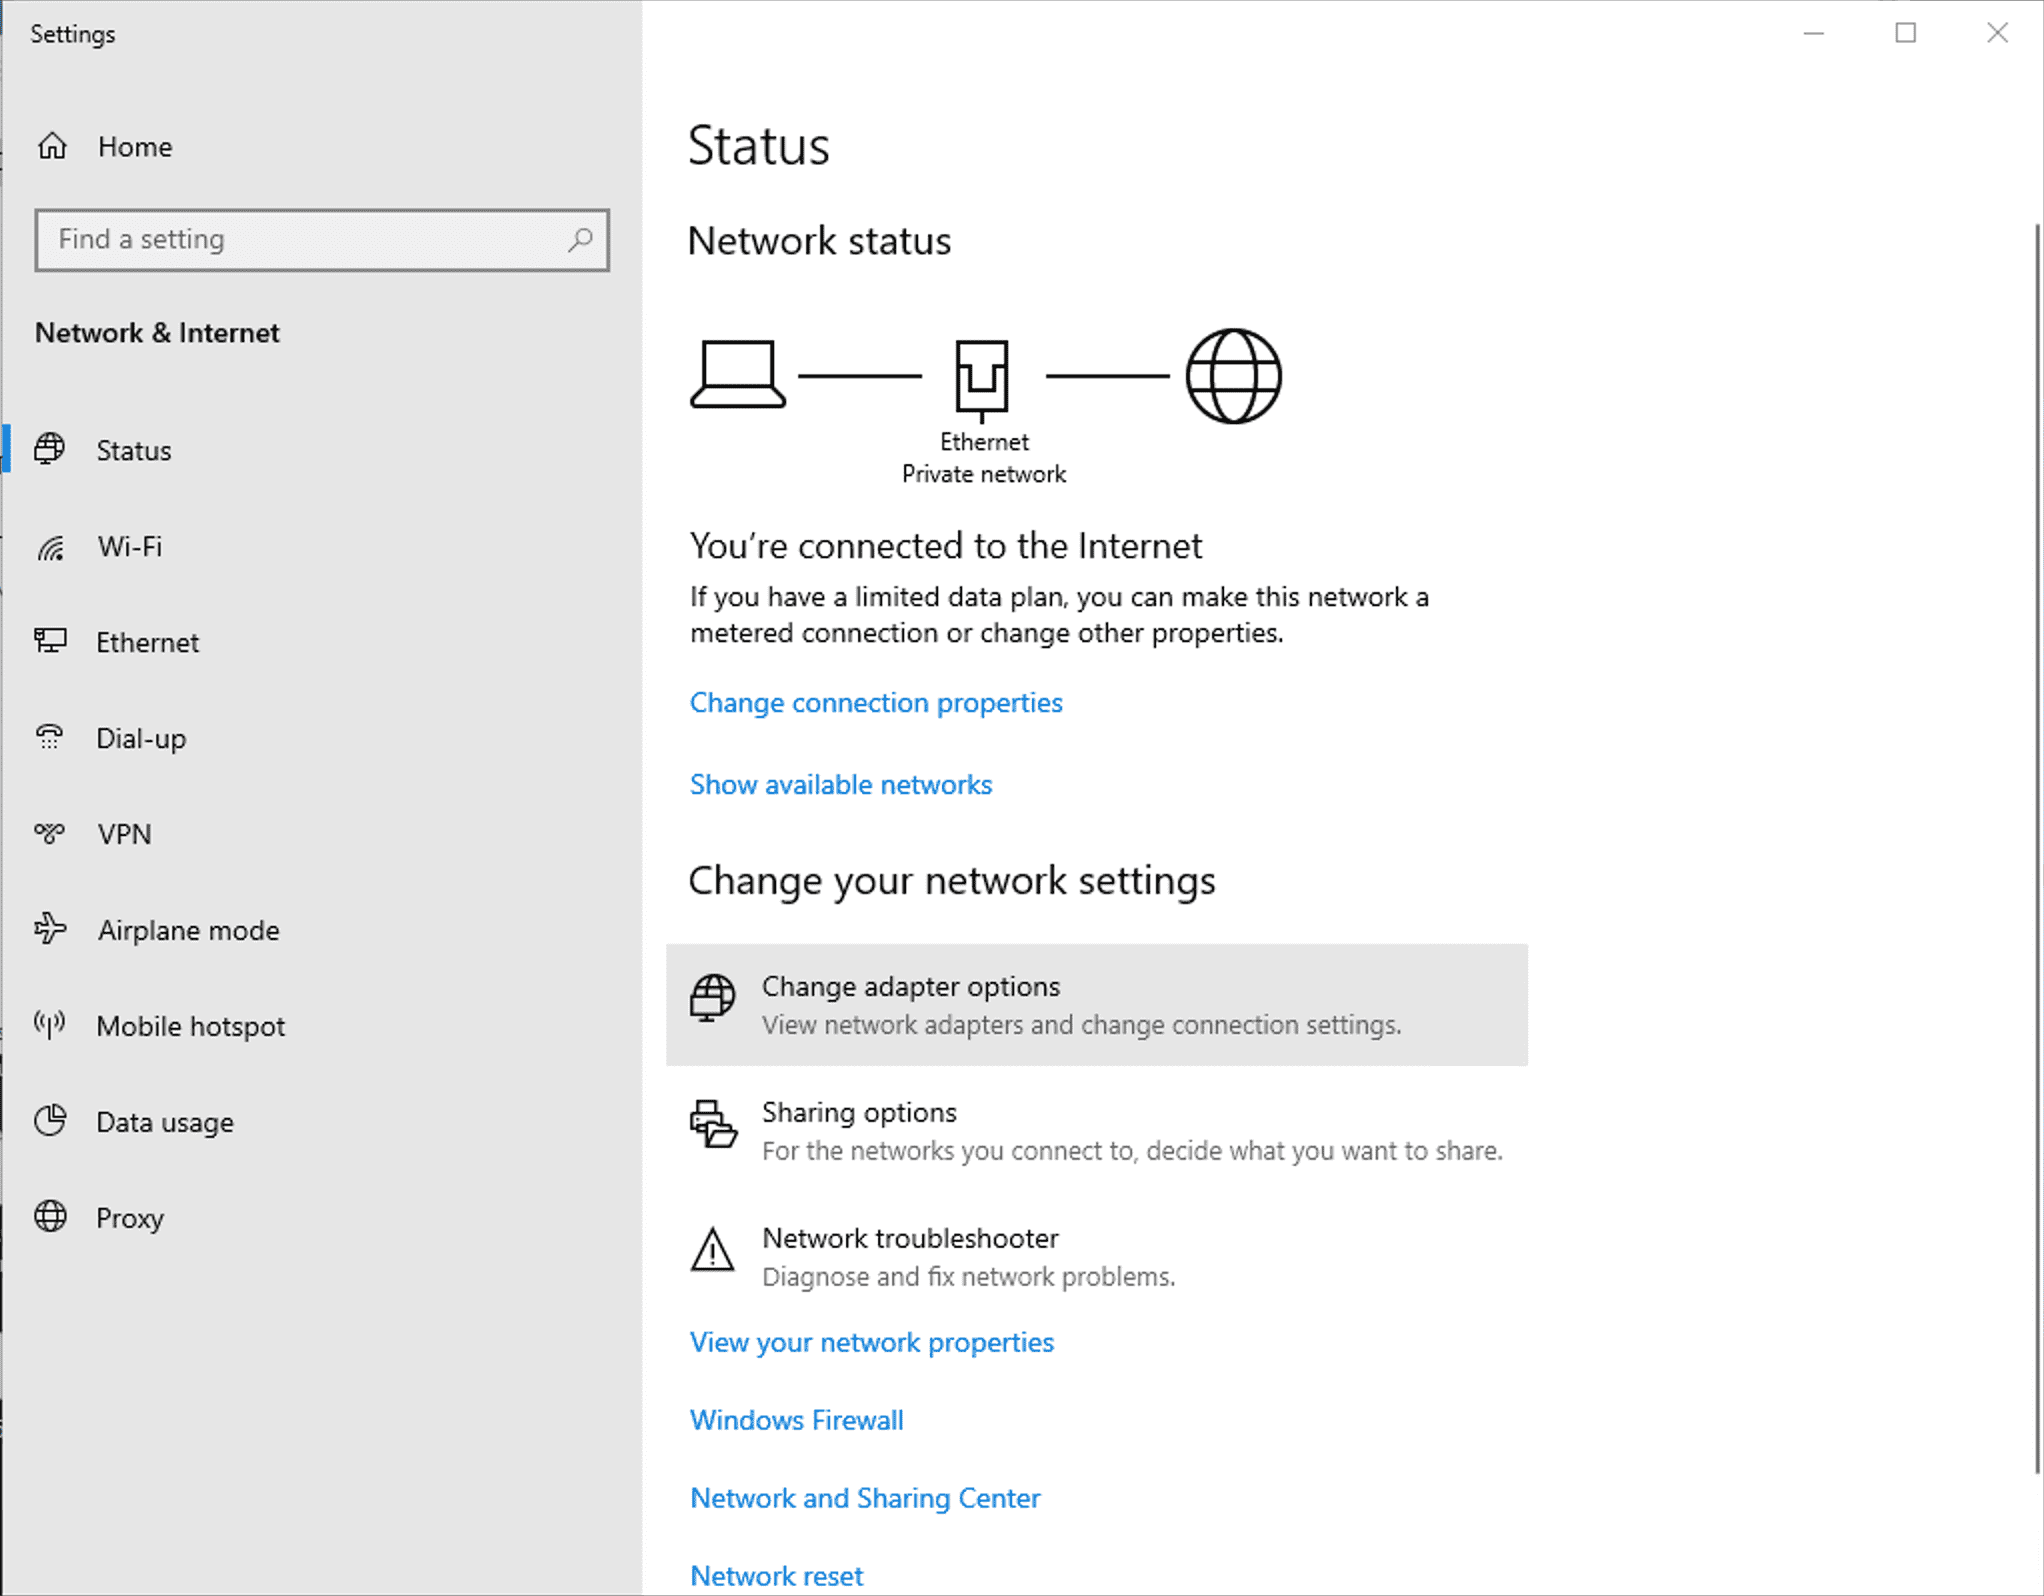
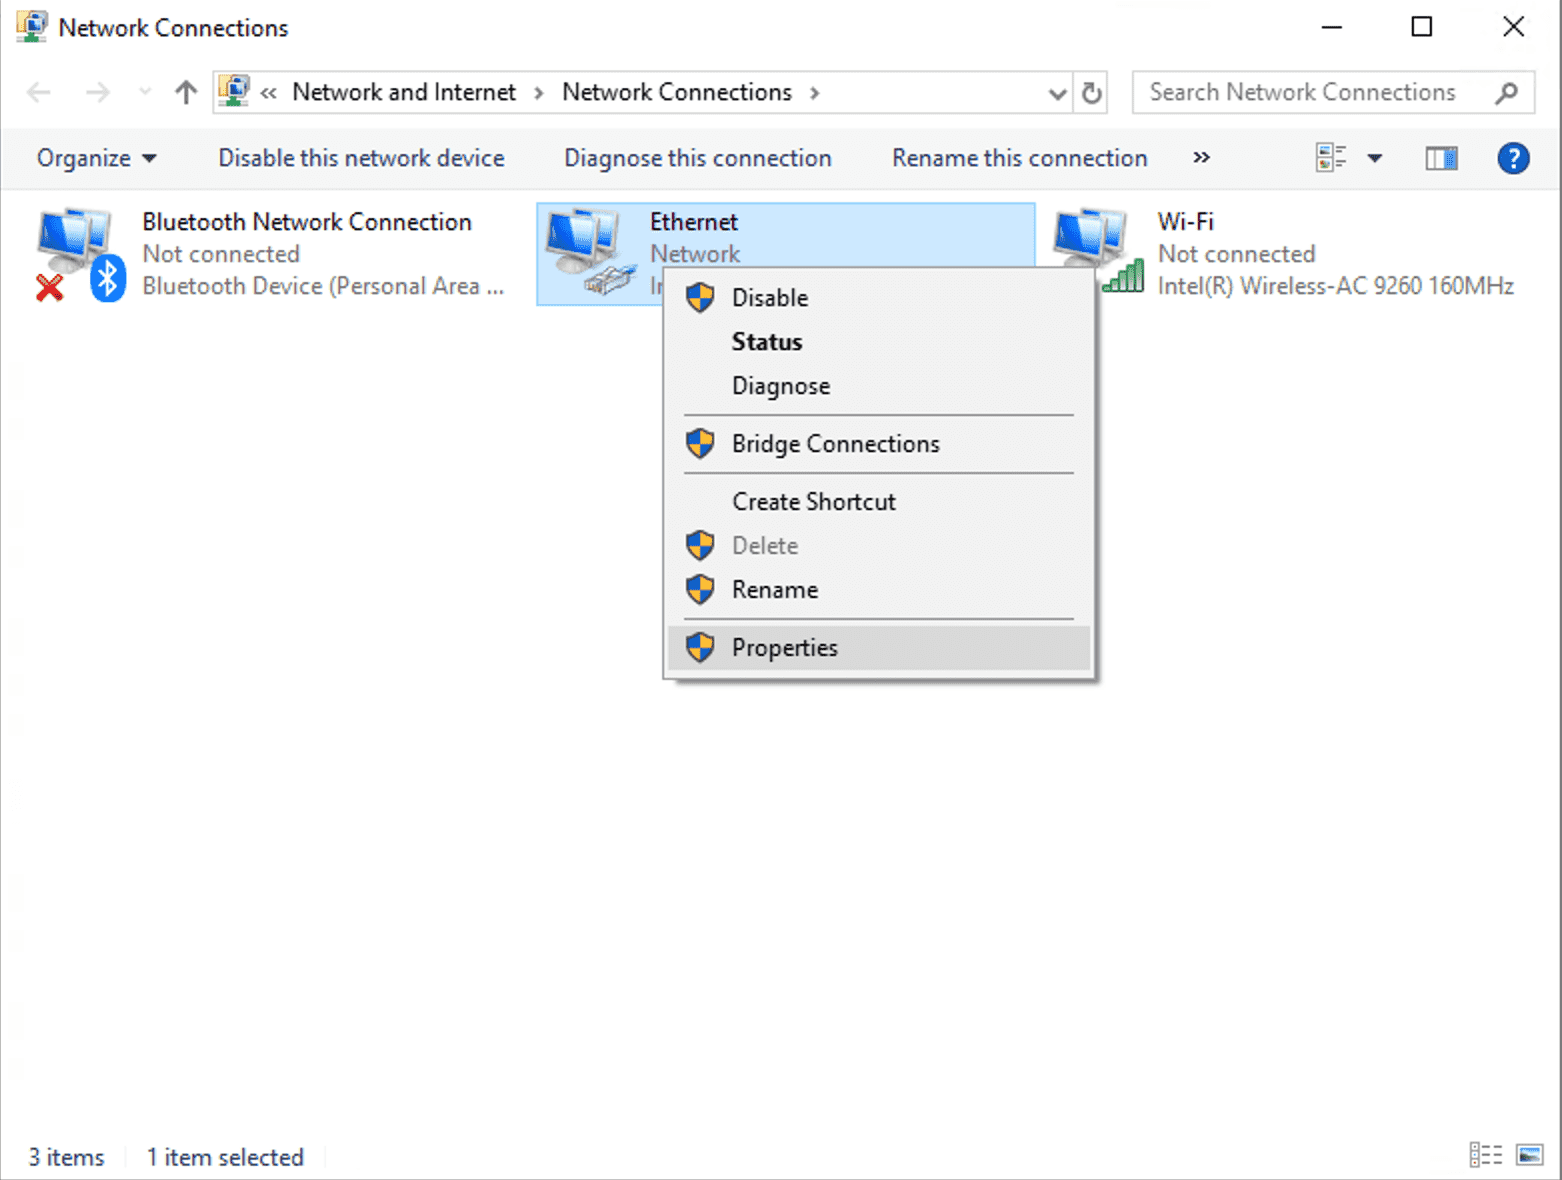
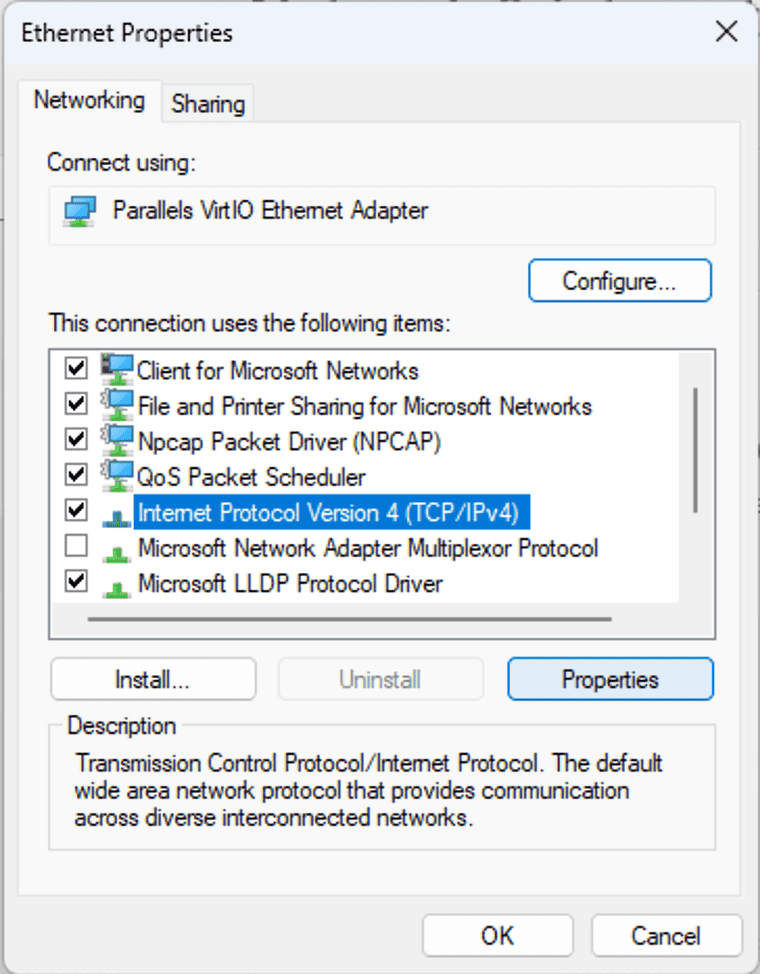
Find the ethernet interface that will be used to connect to XO-VAC+, right click on the network interface icon and click on "Properties".
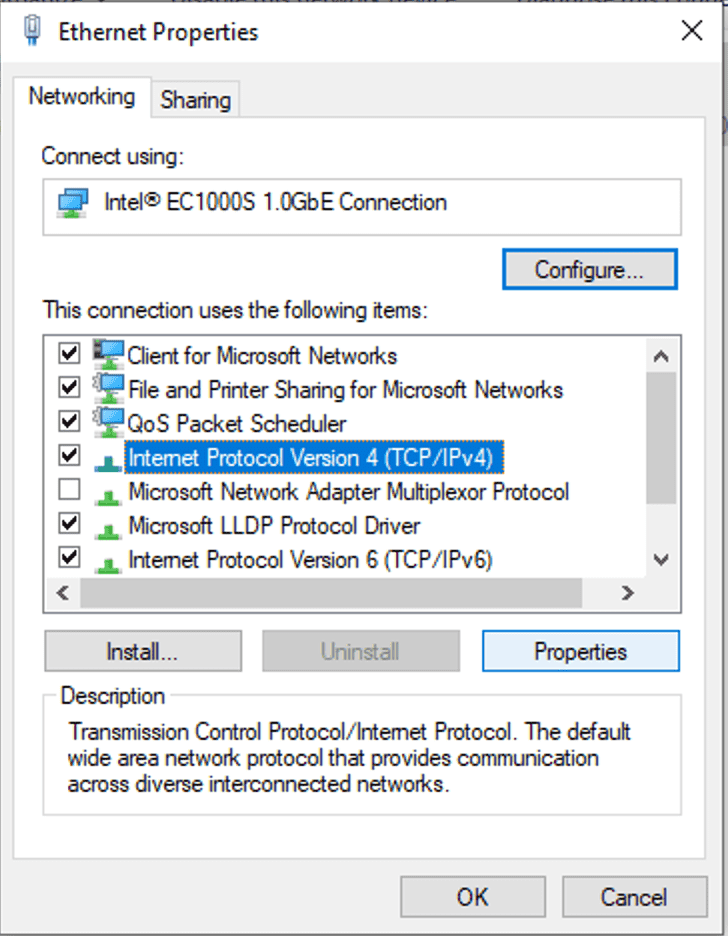
Select "Internet Protocol Version 4 (TCP/IPv4)" and click on "Properties".
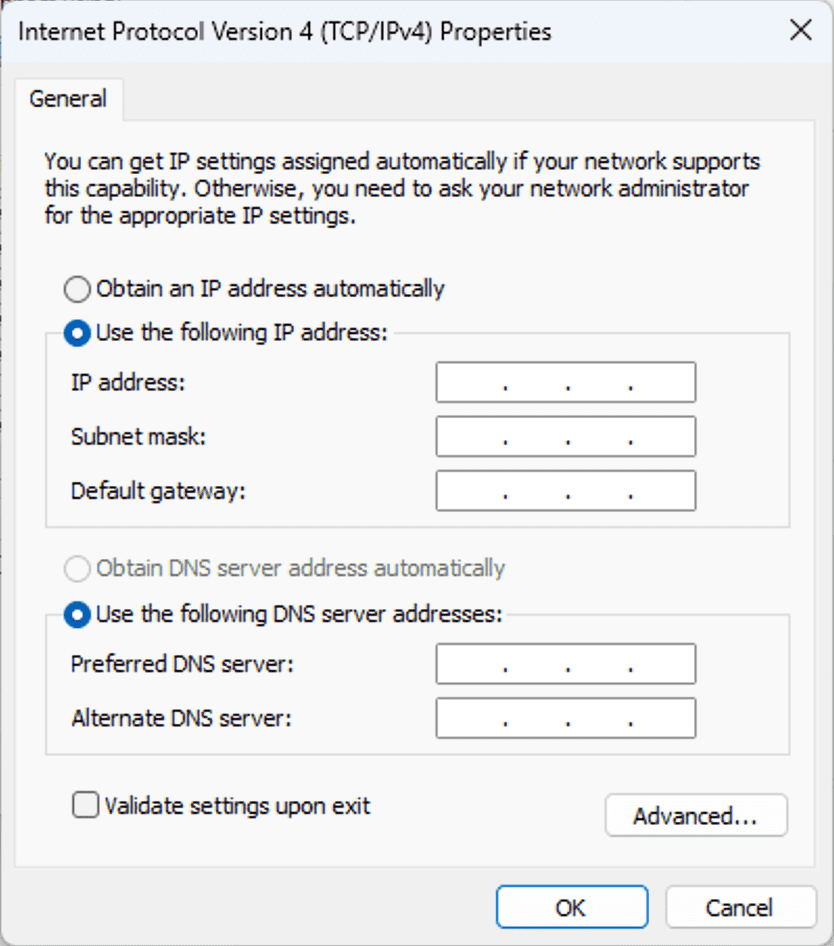
Click on "Use the following IP address" and enter an IP address that is on the same subnet as XO-VAC+ for your client PC.
Enter the subnet mask. (If you do not know what to enter, put 255.255.255.0).

Example
If the XO-VAC+ IP address is 192.168.1.91 and a 255.255.255.0 subnet mask is used, your client PC can have any IP address between 192.168.1.1 and 192.168.1.254 except 192.168.1.91 as it is already taken by XO-VAC+.
As this is a direct connection between two computers, there is no need to fill the "Default gateway" field and the DNS server addresses fields.
Press "OK" to close the configuration window.
Windows 11
Right click on the Network icon at the bottom right of the Windows 11 Desktop and click on "Network and Internet settings".
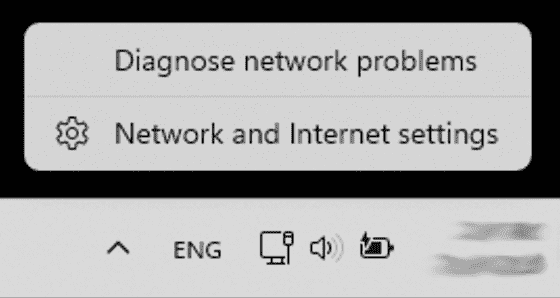
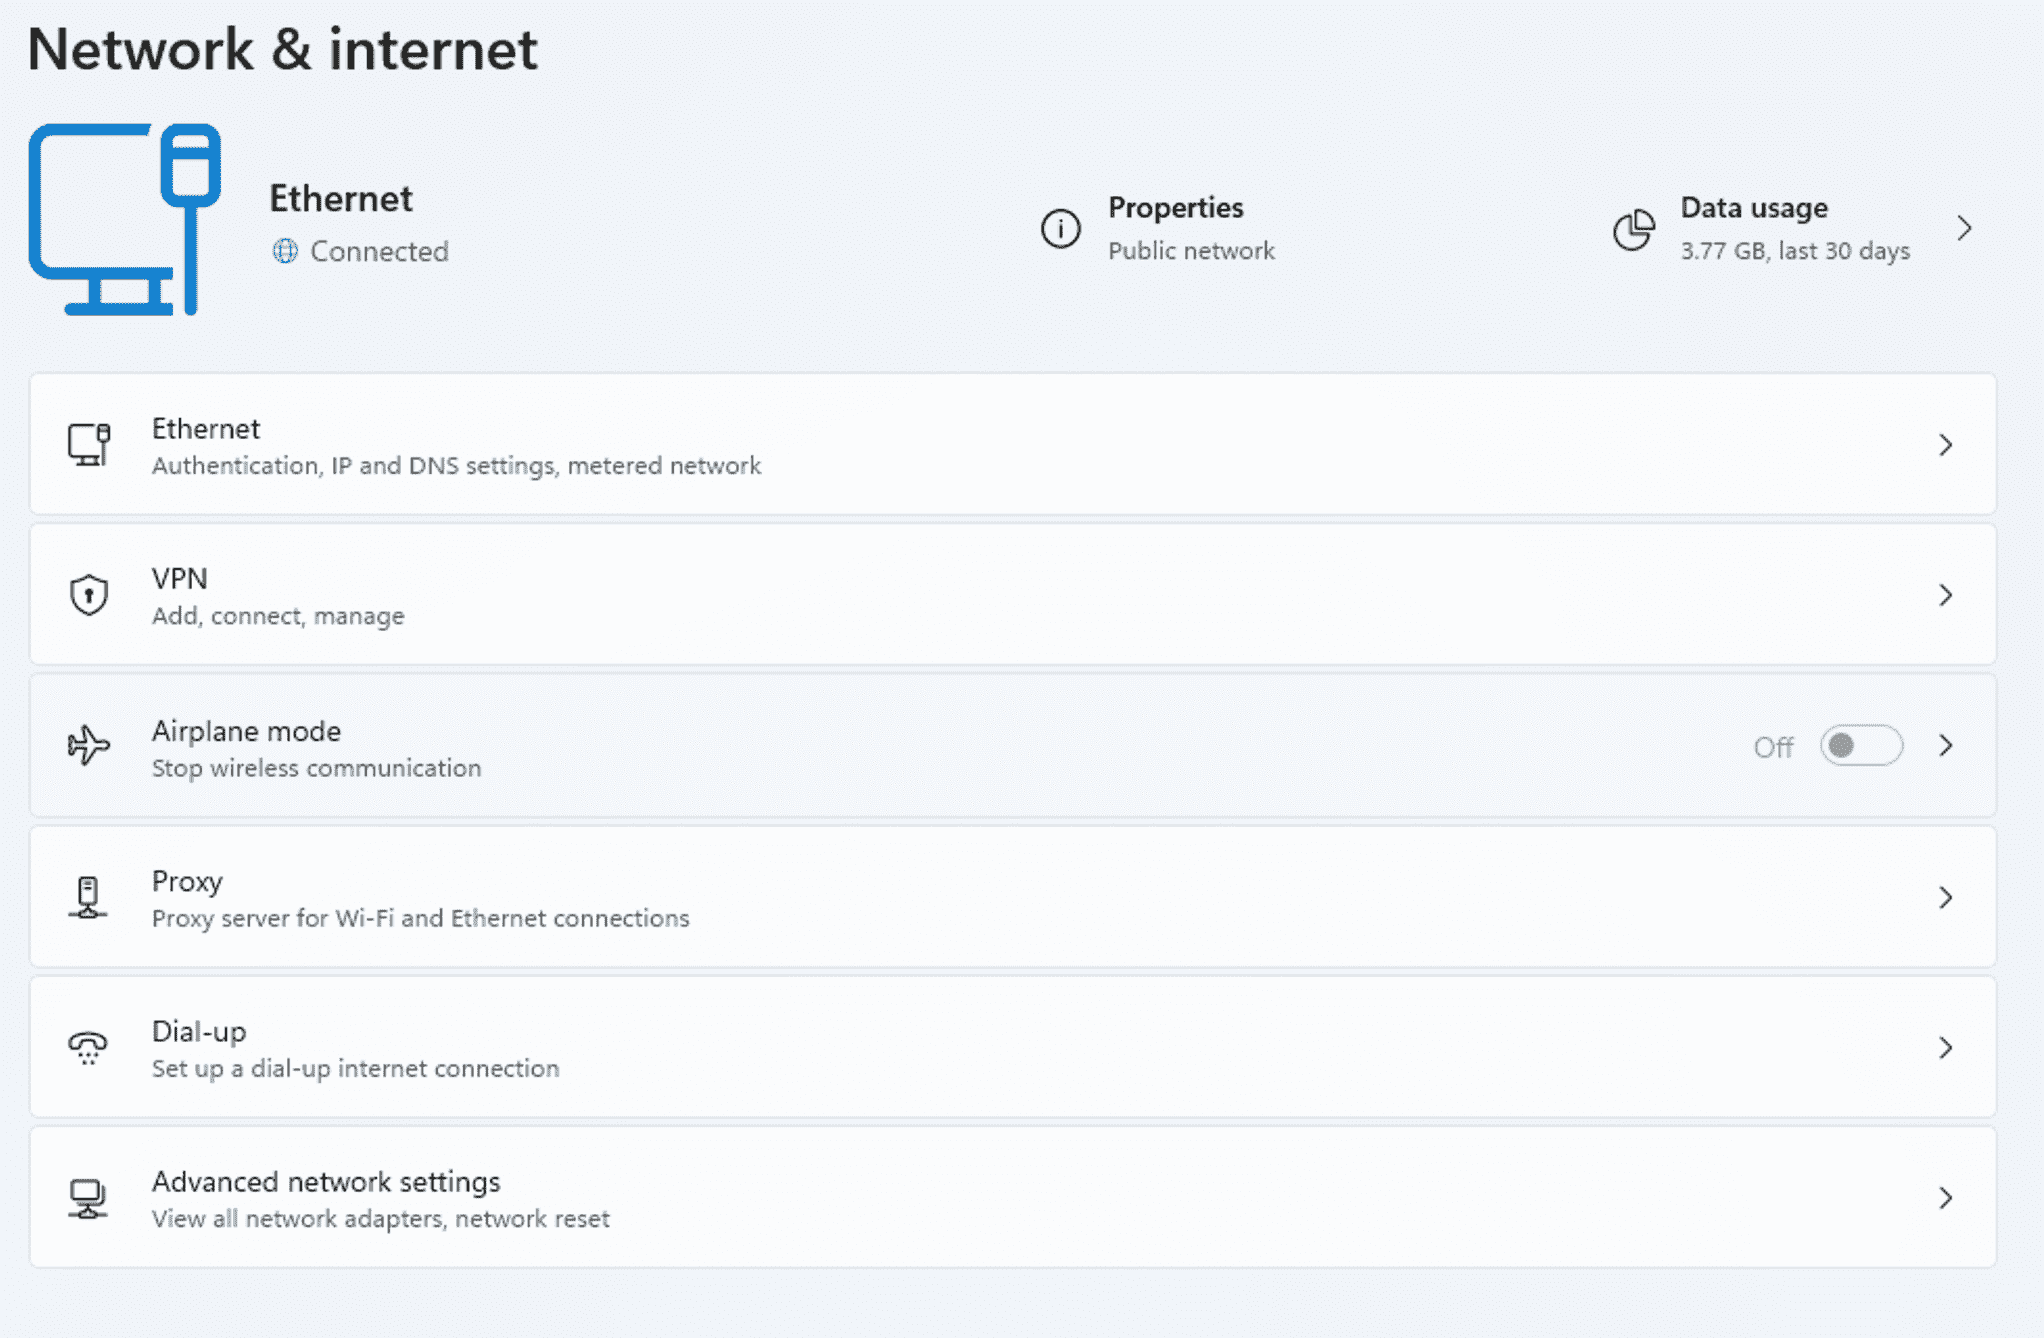
Then, click on "Advanced network settings" at the bottom of the list.
Find the ethernet interface that will be used to connect to XO-VAC+, left click on the adapter name. A menu will expand.
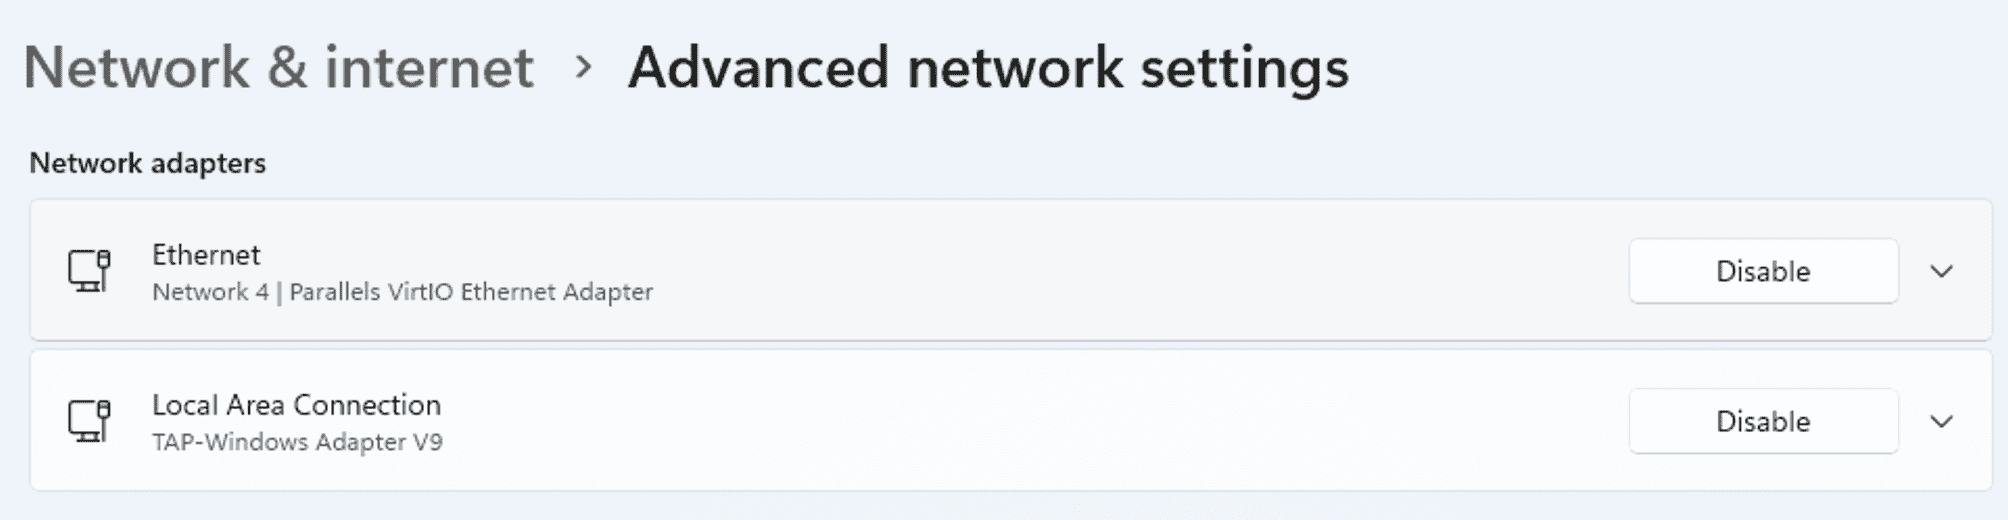
Click on the "Edit" button next to "More adapter options".
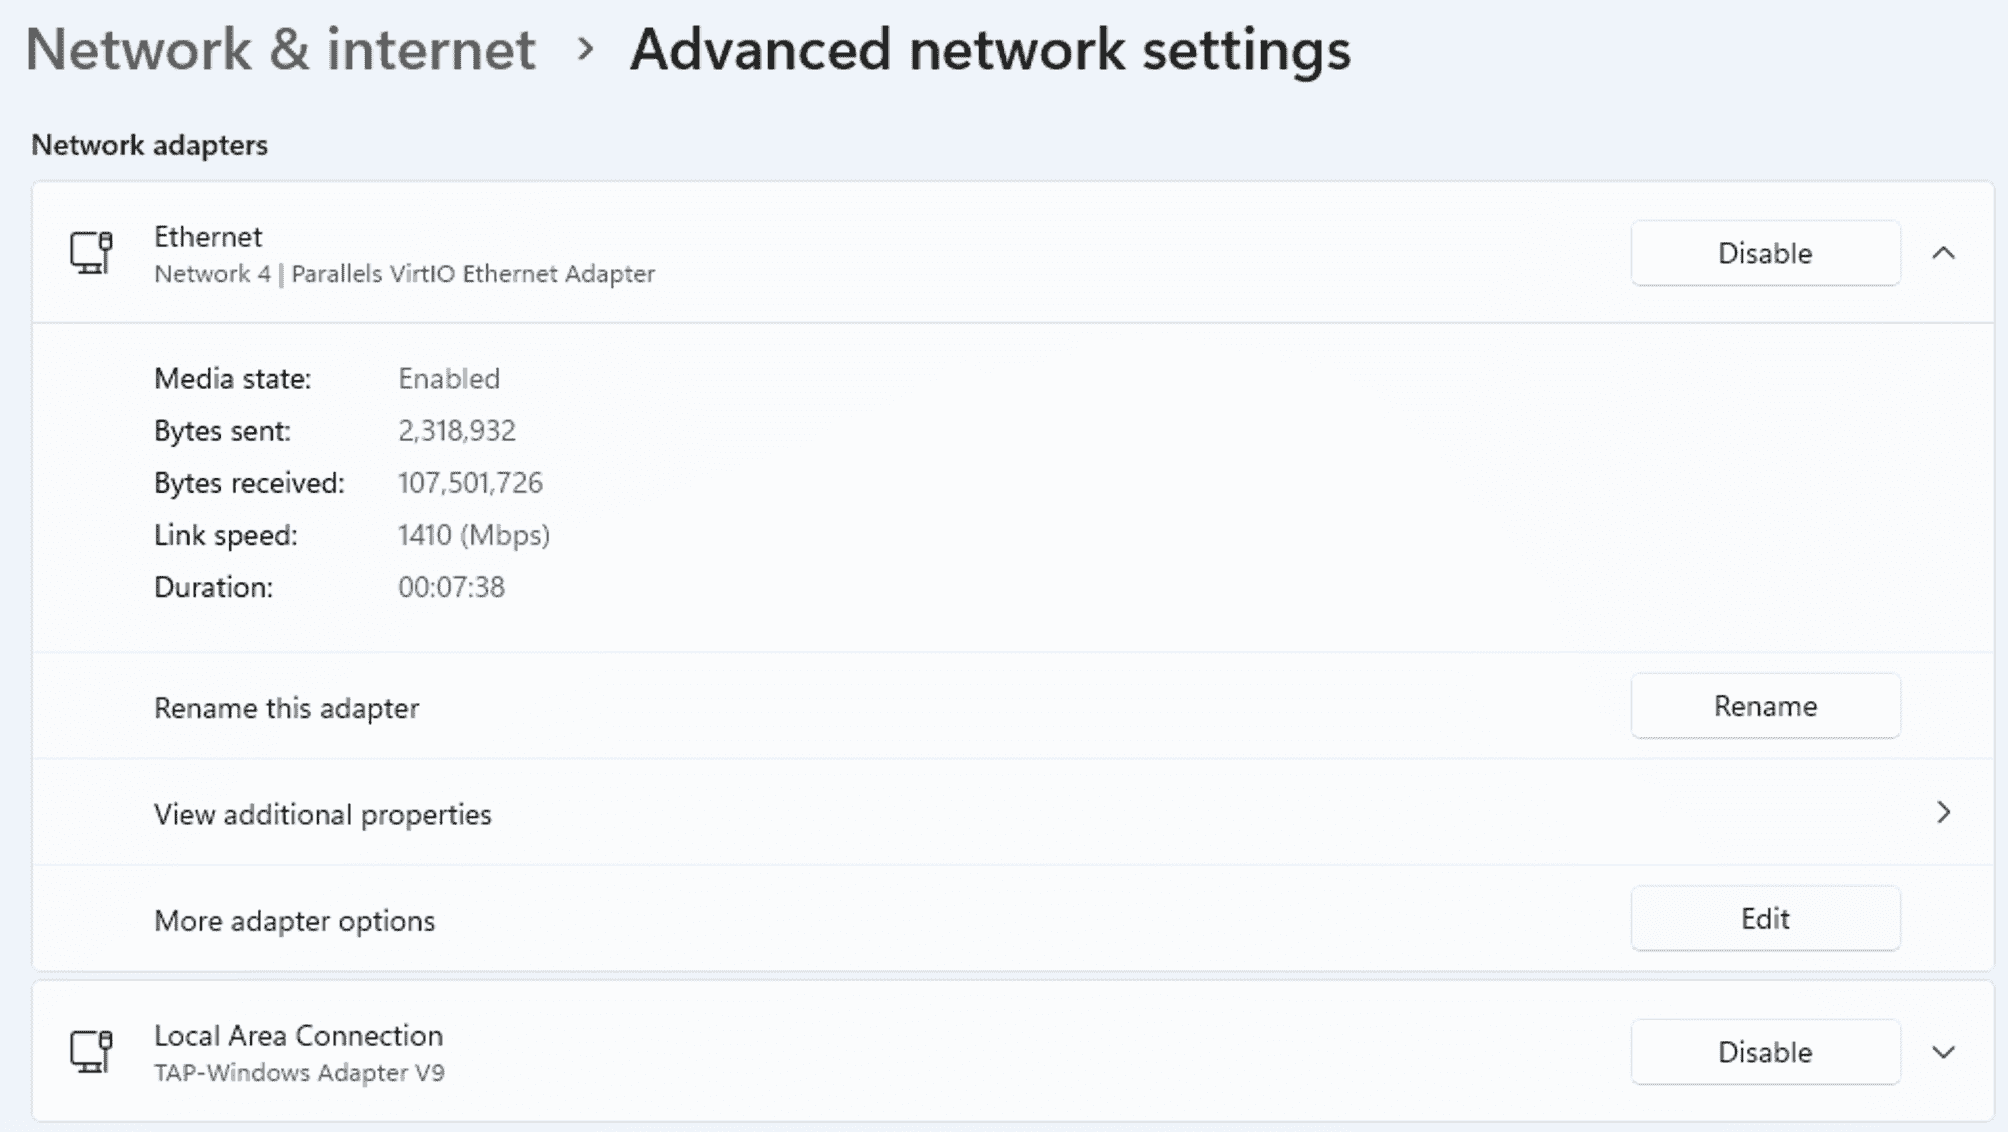
Select "Internet Protocol Version 4 (TCP/IPv4)" and click on "Properties".
Click on "Use the following IP address" and enter an IP address that is on the same subnet as XO-VAC+ for your client PC.
Enter the subnet mask. (If you do not know what to enter, put 255.255.255.0).
Example
If the XO-VAC+ IP address is 192.168.1.91 and a 255.255.255.0 subnet mask is used, your client PC can have any IP address between 192.168.1.1 and 192.168.1.254 except 192.168.1.91 as it is already taken by XO-VAC+.
As this is a direct connection between two computers, there is no need to fill the "Default gateway" field and the DNS server addresses fields.
Press "OK" to close the configuration window.
Other Operating Systems
It is possible to do the same network changes on other operating systems (Linux, Mac, etc.). However, the detailed steps for those are not described here as the XO-VAC+ User Interface software is currently only available for Windows 10 and Windows 11 PCs.
Connection check
Open a new Command Prompt window (Windows + R, type cmd and press "Enter") and try to ping XO-VAC+ on its IP address (192.168.1.91 in the example below).
If the ping is successfull, you can now open the XO-VAC+ User Interface software on your PC. Here is an example of a successfull ping:
ping 192.168.1.91
PING 192.168.1.91 (192.168.1.91): 56 data bytes
Reply from 192.168.1.91: bytes=32 time<1ms TTL=128
Reply from 192.168.1.91: bytes=32 time<1ms TTL=128
Reply from 192.168.1.91: bytes=32 time<1ms TTL=128
Reply from 192.168.1.91: bytes=32 time<1ms TTL=128
Ping statistics for 192.168.1.91:
    Packets: Sent = 4, Received = 4, Lost = 0 (0% loss),
Approximate round trip times in milli-seconds:
    Minimum = 0ms, Maximum = 0ms, Average = 0ms
Client PC connected to multiple network interfaces
This is the most common set-up scenario. The Client PC has one ethernet connection to the XO-VAC+ and is also connected to another network (LAN, Wi-Fi, etc).
The following graph shows a compatible set-up where all network interfaces are on different subnets. If this is your set-up, your network adapter for the direct connection to XO-VAC+ can be configured using the direct connection steps above.
flowchart TD
    B[Client PC]
    C[Office LAN]
    D[Wi-Fi]
    E[XO-VAC+]
    B <-->|192.168.1.0/24| E
    B <-->|192.168.100.0/24| C
B <-->|192.168.200.0/24| Dipconfig. You might encounter issues if you have two network interfaces set-up on the same subnet. An example of an incompatible set-up is the following diagram where the XO-VAC+ and the Wi-Fi uses the same subnet value (192.168.1.0/24) but aren't actually on the same subnet as XO-VAC+ is not connected to the Wi-Fi.
flowchart TD
    B[Client PC]
    C[Office LAN]
    D[Wi-Fi]
    E[XO-VAC+]
    B <-->|192.168.1.0/24| E
    B <-->|192.168.100.0/24| C
    B <-->|192.168.1.0/24| D
The workaround is to change the static IP address to another subnet or set-up a routing rule on the client PC. It is preferred to change the IP address on the XO-VAC+ as it prevents the issue of XO-VAC+ having the same IP address assigned to another device on one of the other subnets (a printer, a NAS, another PC, etc...).
Changing XO-VAC+ embedded server IP address
It should only be needed during the initial commission of XO-VAC+ or if the XO-VAC+ network configuration has to change. The following steps assume that you can ping and connect to XO-VAC+.
- Remote connect to XO-VAC+ using RDP.
- Follow the steps in the
Changing the XO-VAC+ IP Addressof the LAN turorial
It is also possible to change the XO-VAC+ embedded server IP address settings using a SSH connection. However, the steps are not covered in this guide.